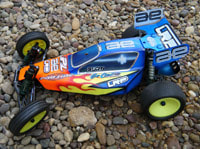
 Note: This article was published prior, however, most of the information is still relevant today. When you go racing make sure you take the time to observe modifications other racers are making to their cars. Pay attention to the details as small refinements can increase your odds of winning. The following examples will deal with a Team Associated B3; however, many of these tips will cross over to other makes and models both modern and vintage. Low Profile Integrated Wing 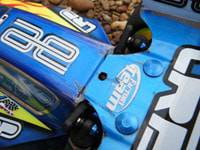 The wing has been lowered and additional holes have been drilled in the rear body (so wing mounts will be recessed) and an additional hole has been drilled into the wing for the use of a body clip. Lowering the wing flush with the body will increase “ground effects” airflow increasing rear traction. The use of a body clip on the wing prevents the loss of the wing in a roll over. More modern kits often use an integrated wing mounting system. Non-Strike Rear A-Arm Axle Modification 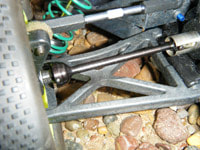 Note material has been removed from the rear A-Arm where the CVD Axle could strike the arm under extreme shock compression. With proper shock spacing suspension travel can be increased over stock angles allowing your car to soak up extreme bumps. This modification will allow you to stay in control of the blue groove while your competitors are literally bouncing along uncontrolled. Body Rub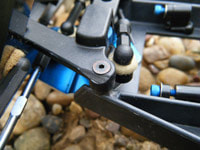 How many expensively painted bodies have you seen at the track with rub marks in all the same places? The simple solution is a small strip of electrical tape, but this can wear through as well, and with lighter paint schemes can show through the body. Another alternative is to remove material from the friction point. Low CG Servo Modification 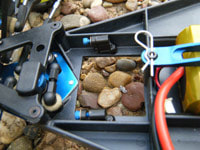 Center of Gravity (CG) high points on any RC vehicle consist of the motor, battery (less so with the introduction of LiPo batteries), transmission and servo. Lowering CG allows your car to hug the racing surface resulting in an increase in both high and low speed handling and decreased lap times. A rotary tool with a grinder and cut-off wheel are all that is normally needed to complete this modification. A quality file and sharp knife can be useful for deburring any excess plastic (ensure care and proper safety equipment is used any time a knife or power tool is used). Some pre-planning and marking of the area should be done prior to starting. Remember it is easier to remove more material than it is to put some back. Work slowly and smoothly. Rounded edges are preferred to angles (the above is not the best example) as angles may increase the chance of an apex crack developing. Note that the servo mounts have also been trimmed so that the servo’s lower surface is flush with the lower chassis. Scuffing of the servo can be avoided by using electrical tape. If racing on a prepared racing surface servo scuffing should be minimal. If bashing on the street or on an unprepared racing surface this modification may increase the chance of Foreign Object Damage (FOD) if the servo takes a direct strike. I have seen many racers use this modification without incident, but there is some risk involved. Low CG Battery Modification 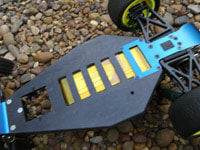 The same modifications can be done for battery packs as well. Clearly this modification is NOT for use with more modern LiPo batteries and carries the same benefits and risks associated with the above mentioned servo modification. Insure that all edges and burrs, that may rub away a batteries protective covering, are removed. Slots should be angled to accommodate the cylindrical surface of Sub-C cells both to avoid wear on the battery and to further lower CG. Strategic Removal of Excess Material 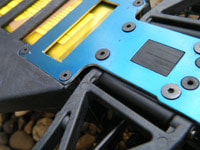 Everyone knows that the less “weight” (mass) a kit has the faster it can go for longer. RC kit manufactures know this as well and this is the reason that “exotic” materials such as carbon fiber and titanium are often integrated into the design of any race vehicle. What the manufactures would like you to believe is that their Computer Aided Designs (CAD) are the best, and it is true that we as racers benefit from CAD design and stress testing that was not available in times past. What engineers fail to tell you is that designs are often a trade off against competing factors between physics (gravity, heat, wear, material strengths, etc.), and design and material costs. It is not always cost effective to integrate every beneficial material or design feature into a part. For this reason when I approach the modification of a kit I consider the extensive design experience of the designers an “excellent start”. This is not to say the manufactures do not know what they are doing, they do (clearly the number of ROAR and IFMAR titles the AE staff has under their belt proves this point), but parts can often be improved over the original design with little or no cost to the owner other than tools and time. For example, in the above photo the rear motor plate has been “shaved” to remove material around its edges to decrease weight. AE could have removed the material, however, the part may have become increasingly complex and expensive to make. Team Associated wants to be able to provide you with a kit that is high tech and affordable.
In general, if a part is easily broken (we all know what parts these are) do not modify it. For areas that are not under high stress, parts can benefit from a weight loss program. Often edges can be safely removed or rounded, holes drilled, etc. to improve the part. Do not leave rough edges (as this may injure a turn martial), avoid angled parts in favor of circles, arches, or compound curves as these will tend to increase the strength of the part, reduce mass and avoid cracking. Remember that reducing weight is cumulative, in that small areas removed in multiple locations, can add up to substantial savings. Aircraft manufactures have known these tricks for years as less weight increases fuel economy, and increases the efficiency of the airframe. Some parts, if drilled properly, can actually be both lightened and strengthened several fold. Use common sense when modifying a part. We have all seen examples of the “Swiss Cheese Chassis” at the track and the goal is to go lighter and faster without a DNF. Photos courtesy of author's collection. RC car was photographed at Victory Base Complex, Iraq 2010-2011.
1 Comment
|
AuthorMichael Rogers Archives
July 2022
Categories |

 RSS Feed
|
|

|

|
The best way to search for the part you need is by the manufacturer's part number. If you do not know the part number, please visit our Archive Page, or use a common term like, "Losi XX shock tower."
All prices are in USD. Copyright © 2011-2024 Valkyrie RC Motorsports LLC. All rights reserved. All product names, logos, and brands are property of their respective owners. All wording and photos on this site are the property of Valkyrie RC Motorsports LLC, and may not be used without prior written consent..
BBB current rating is A+.
BBB current rating is A+.