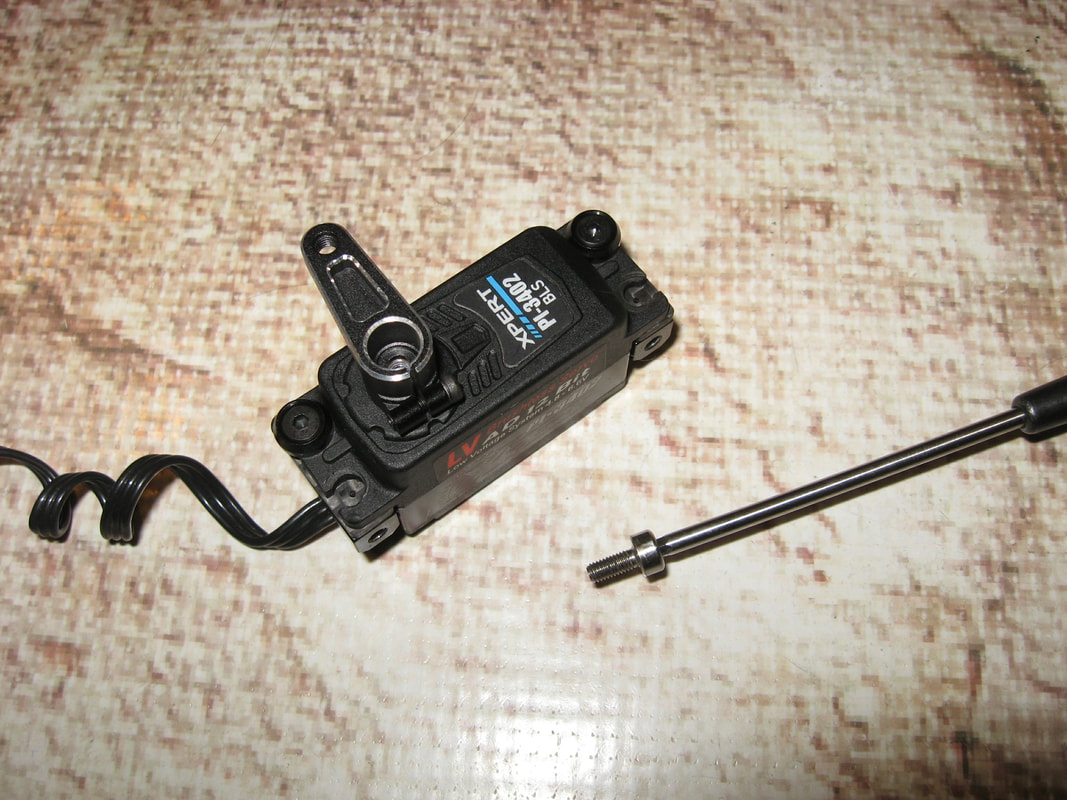
 Often servos come with an insufficient servo horn bolt for racing purposes. That tiny Phillips head bolt that came with the servo is more prone to stripping and also letting you down in the final turn. Most metal splined servos can use common 3 mm motor Allen hex screws that offer 2.5 mm of grip. This allows for a better connection, and is much less prone to damage. In the photo above I am replacing the stock bolt with a Lunsford titanium screw for both increased durability and weight loss. A very minimal amount of blue (temporary) thread locking compound should also be used, however this is one area that you do not want to go overboard. Last, ensure that the screw is the proper length for your application or damage may result.
Note: This tip is not recommended for Nylon splined servos.
1 Comment
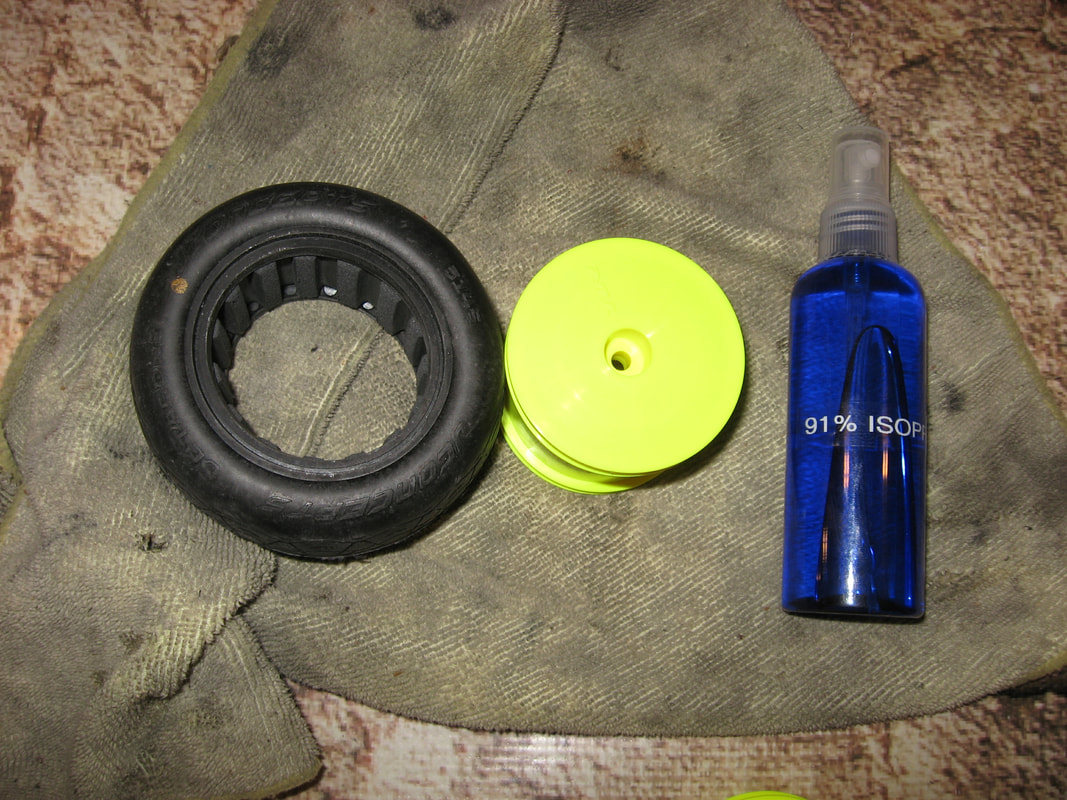
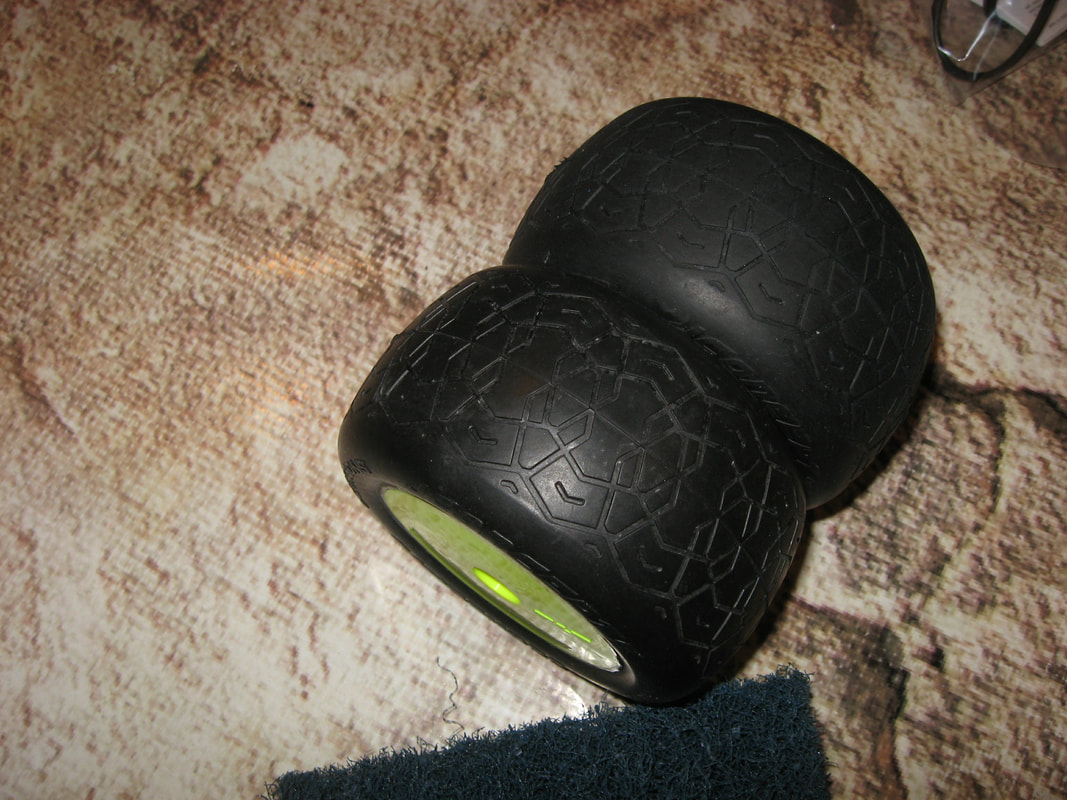
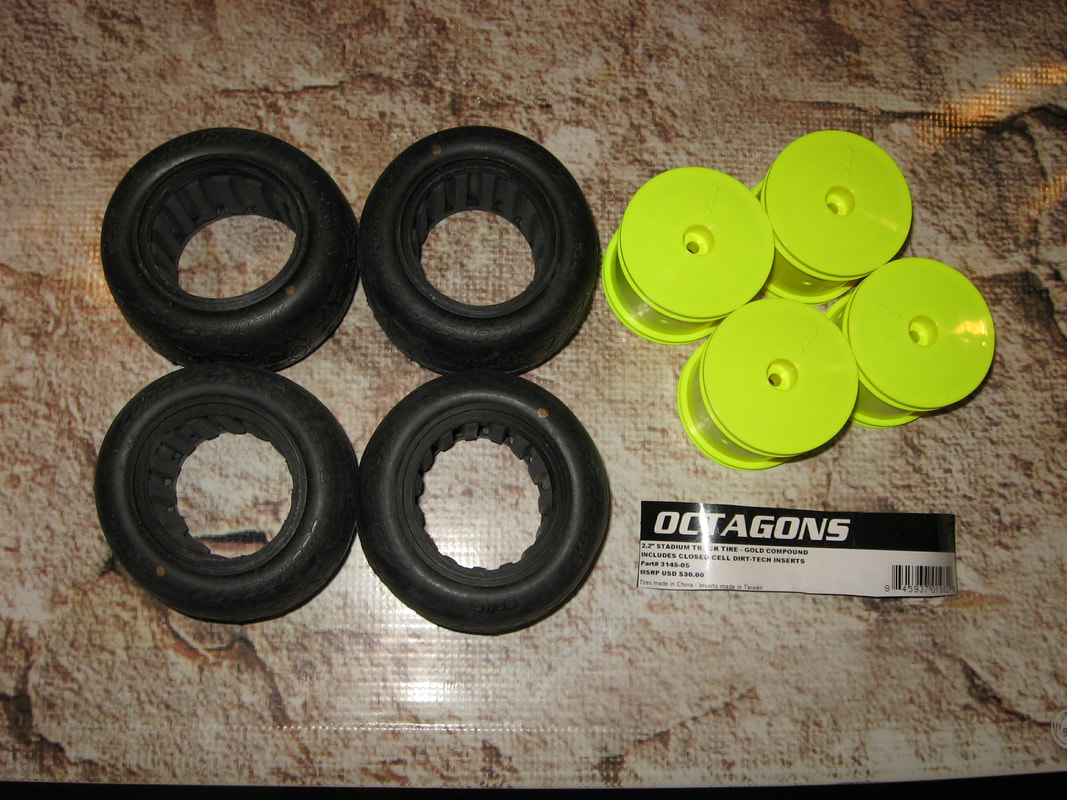 Tires are by far the most important part of your RC racer. If your tires are not in contact with the racing surface, you may be fast, but not actually in control. Too often tire prep is neglected, "glue and go" just gets you going, not winning. As a note, safety glasses and gloves are recommended when dealing with any chemical or rotary tool. Tire SelectionI am not going to go into detail here on tire / insert selection, as it will vary from track to track. Ask the owner, ask the fast guys (or peek) what they are running, and pay attention to tire compound. There can be huge differences in tire performance, with only a minor change in rating (normally a manufacturer color code). This is not to say you should be scared to experiment, however, tires are costly and selecting multiple pairs of incorrect treads can financially set back your racing program. Once you know what tires work, stockpile a few sets of both your primary and secondary treads. Track conditions can and do change, and if attending large races local stock can be unobtainable, as the shelf goes bare. Tire Prep And GLuing
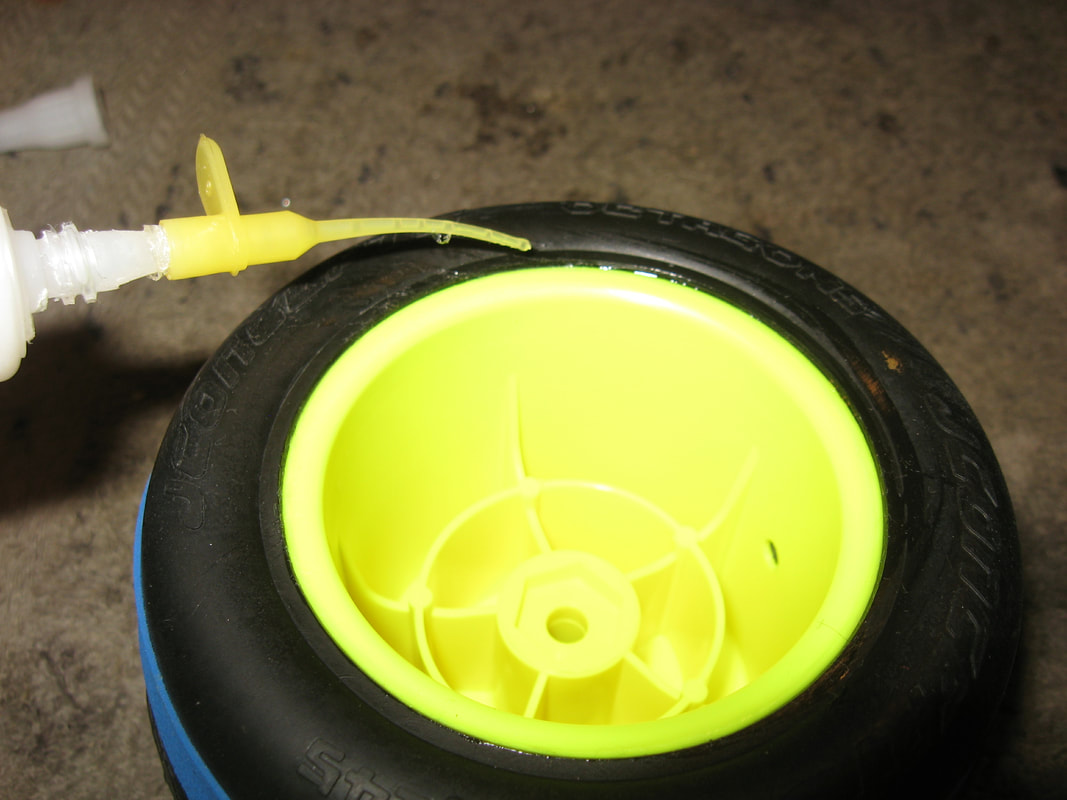
Tire prep and gluing are the most critical steps in tire preparation. Isopropyl alcohol should be used to clean both the tire and wheel mating surfaces. This will remove any mold release agents, and allow the glue to bond better. This will also stop most later peeling of the tire requiring re-gluing. 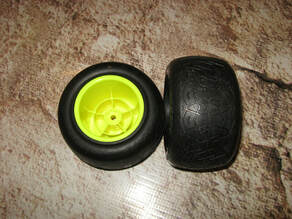 Once dry from the alcohol, a last double check of the insert should be done prior to placing on the wheel. Look for any defects or bunching, and correct as needed. Tire bead should be worked around and properly seated prior to gluing. Tread Direction and manufacture color dot should also be checked. It is very easy to glue tires facing opposite directions than intended (CA de-bonder is valuable if you have ever done this). The tire color code dot should be faced to the inside if possible, as this will decrease the likelihood of it wearing off. Many RC tire gluing tools and jigs have come and gone over the years, supposedly with the intent of making gluing easier. Some work well, but most do not. A clean work surface, a clean rag, and a set of quality rubber bands is all that is really needed.  Proper Cyanoacrylate (CA) glue should be used, and never the cheap kind, as it will most likely crack and not bond properly. This is not to say you can not use other non RC brands, but some thought should be given to thickness, drying time, and brittleness when dried. I find the thinner CA easier to work with and longer drying times are a must in case a mistake is made. Use the fine glue tips provided, trim as needed, and pick up spare tips, as they mostly are not easily reusable. For actual gluing, use a clean and disposable work surface (a clean towel), select a visual starting and ending point on one side, and slowly peel the rubber edge way. Insert the glue tip and start applying glue. Work your way quickly but not rushed in a circle applying glue to the outer bead of the tire carcass. Go slow, and use as little of the glue as needed. I apply a small amount and slowly allow the bead to seat again, this pushes the liquid glue ahead of the exposed bead and allows for a selection of how much glue is needed in the next section. Once completed, quickly wipe any excess glue, if your good there will not be any. Apply the rubber band to the tire and allow to totally dry. Once dry, remove the band and check for any sections missed, repeat as needed until you have the bond your are looking for. As a last step, I run a small bead along the edge where the tire meets the wheel, and roll it around the tire. This seals the edges from dirt and also fills any smaller areas that you may have missed. Repeat the above steps for both sides, insuring that the tires are dry prior to placing them on anything you value. RC Tire Balancing And Venting
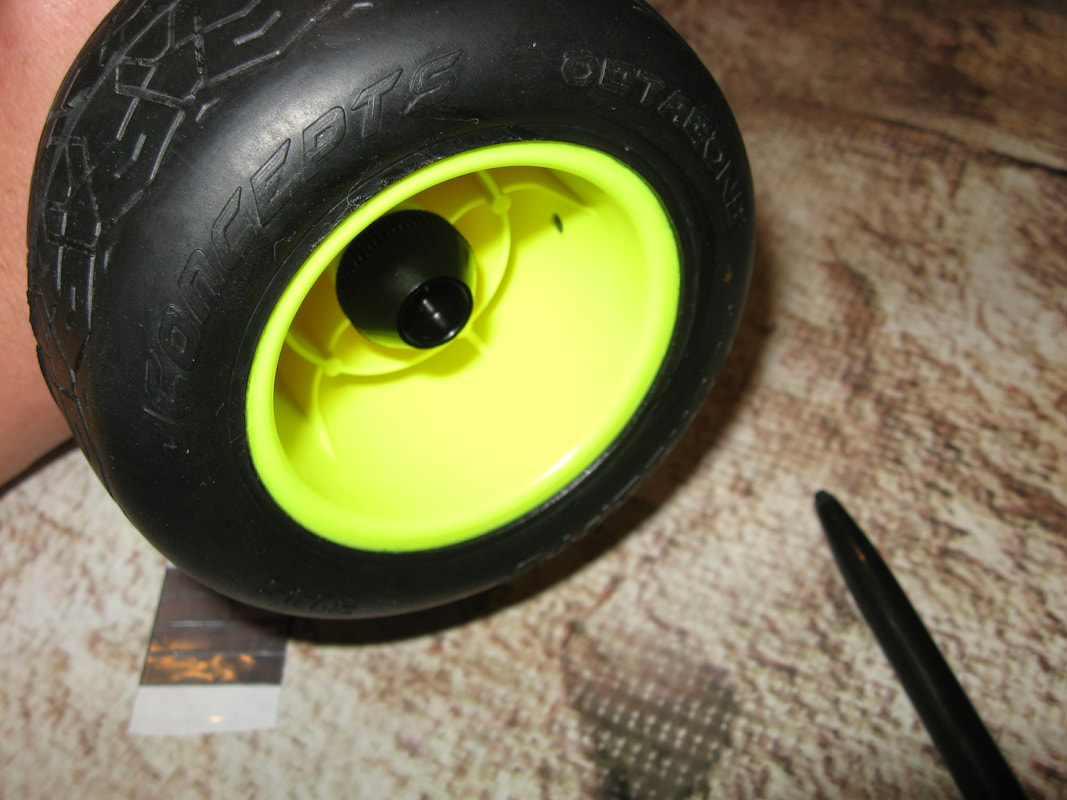
A lot of people do not take the time to balance or vent their racing tires, but the pros do. As with full size racing, any time the tire is not in contact with the racing surface you are not in control, and an out of balance tire can also lead to premature shock seal and suspension wear. Start by purchasing a quality balancer, mount and spin the tire. Once the tire stops spinning it will wobble to the heaviest side, the bottom. Use a grease marker to mark the OPPOSITE side (top), as this is the side in need of weight. Place the self adhesive weight or putty at the center of the wheel, at the marked point and repeat until the tire stops at a random. The random point is ideal, as it indicates a perfectly balanced tire, however this is often a fools errand. You may spend hours and add a lot of wight needlessly, know when to say when. I normally stop after three spins, as this normally greatly improves performance, but does not add excessive weight or waste time. Last, the weights can be added as Lead (Pb) or putty. Lead is toxic and should not be handled unless wearing gloves. Wash your hands after handling and do not eat or smoke until doing so. Most RC wheels come pre-vented with holes already drilled into the wheel. If wishing to run a flatter, higher drag, but more traction tire, either the original wheel holes can be enlarged or the tire itself punched. I have heard a lot of arguments, as to where to place the hole. Some say center of the tread, as this will allow any water from cleaning to exit, some say the sidewall center. I have also seen sidewalls tear, sometimes starting at the vent hole. As a compromise I have been venting the tires at a 45° angle where the sidewall meets the treaded section on the inside of the tire. RC Tire Scuffing MARKING & Storage
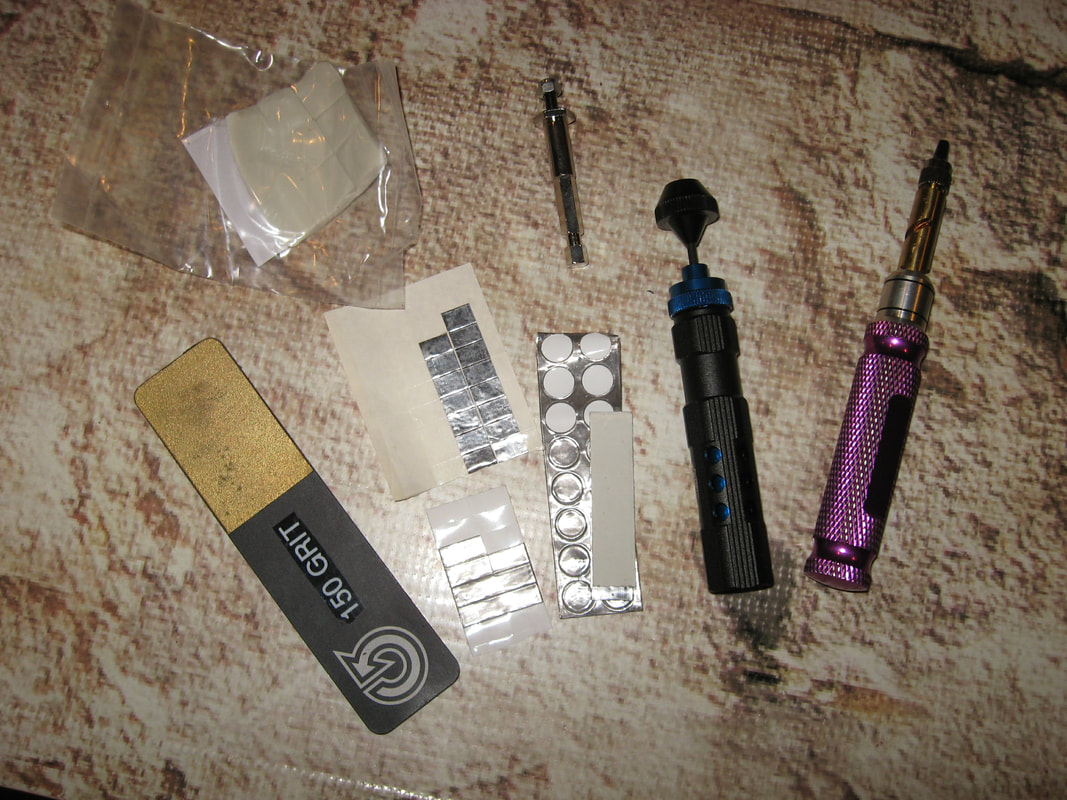
If racing on a clay surface, most racers are now scuffing their tires. This removes the center mold bead, and increases traction by increasing the surface area "patch" in contact with the racing surface. There are many tools currently on the market to spin the tire ranging from dedicated motors to common power drills. Various grits (150 and 180) of sandpaper and commercial scrubbing cloths are all that is required. As with any spinning tool, one should keep loose clothing or other items away as they can easily get wrapped up in the tire and pose a danger.
I recommend marking the inside of the wheel with the tire compound and insert type at a minimum, with a permanent marker. That tire color dot will often vanish leaving you to wonder was this a blue or purple compound? Some people like to also mark the date, direction, and number of times run. Last, tire storage. A lot of racers like to keep the reusable tire bags that came with the tire at the time of purchase. Personally, I find them hard to work with and visibility is an issue when digging in a bin between heats. I prefer a common zip locking gallon bag, marked with the tire information removed from the original packaging. For long term storage (years) an O2 absorption packet should be tossed in and the bag thermally sealed. Taking the time to do a quality job will allow you to prep a race winning tire that is faster, smoother, and quieter than the competition, and is worth the time and expense. Try it, you will see I am right. 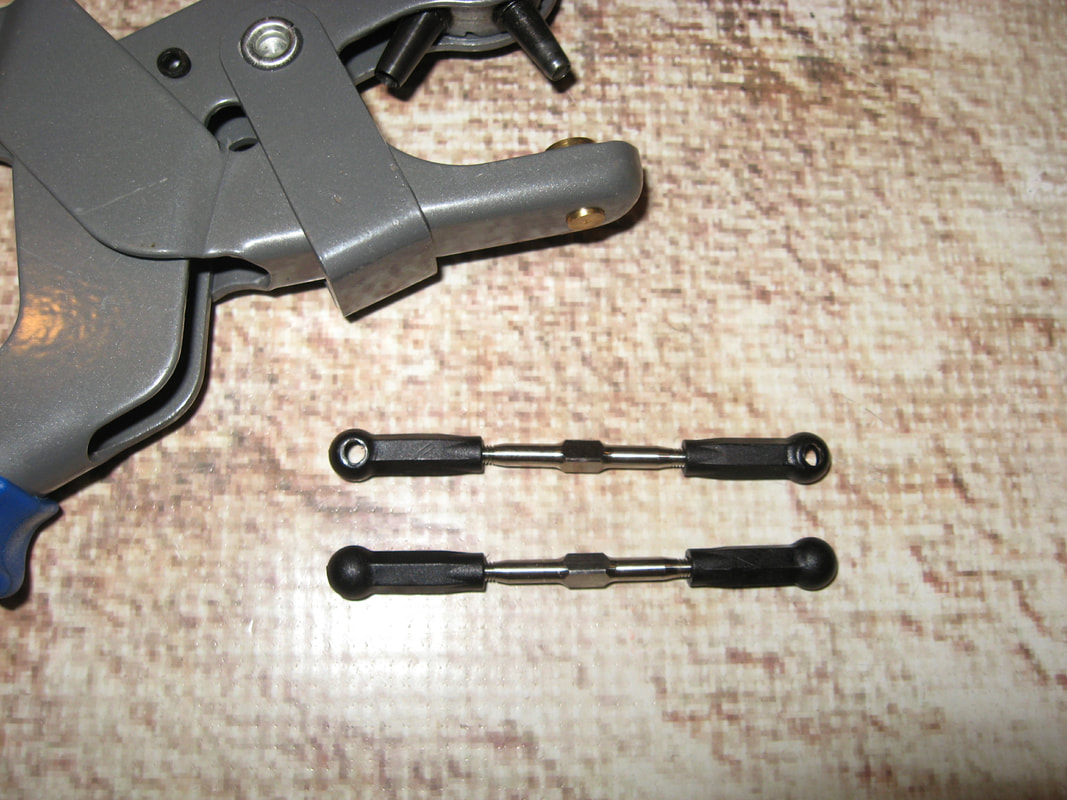 One of the best recent innovations to the ball cup is an adjustment hole. The hole makes building easier, without marring tools such as pliers, however, not all ball cups have the hole. You can use a standard tire hole punch (shown) to make our own. A useful tip for those kit releases without, including the recent Losi 22 5.0 release.
Tip Pros:
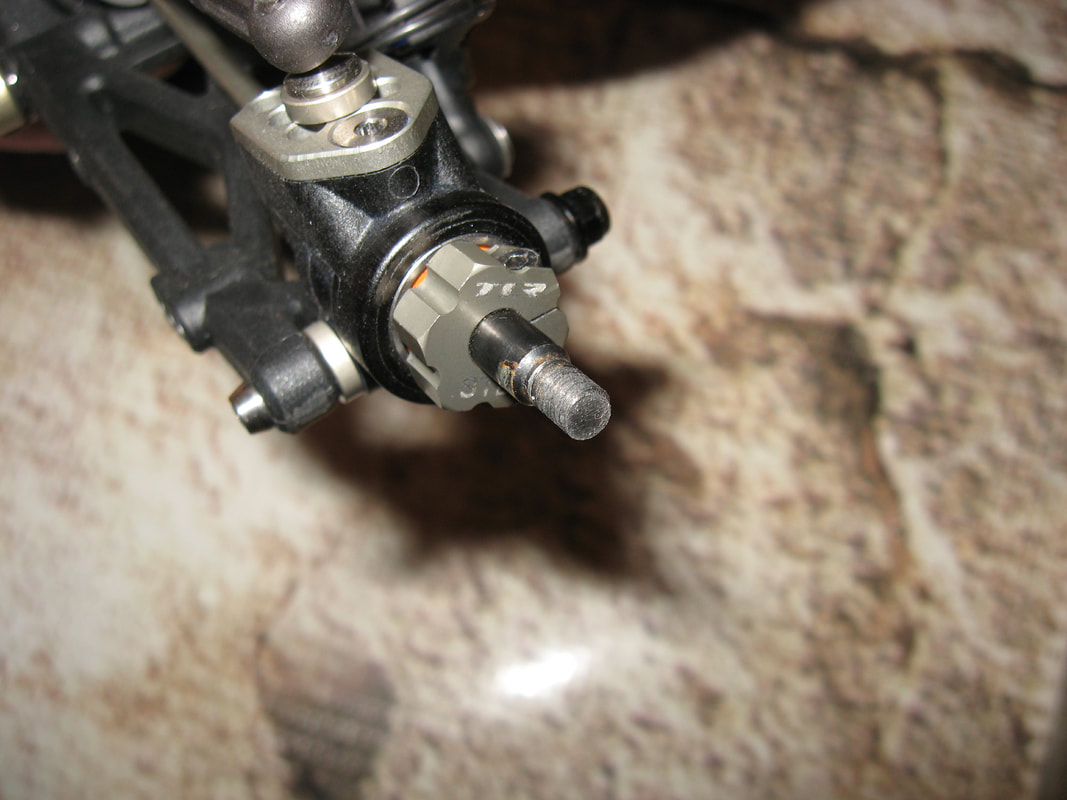
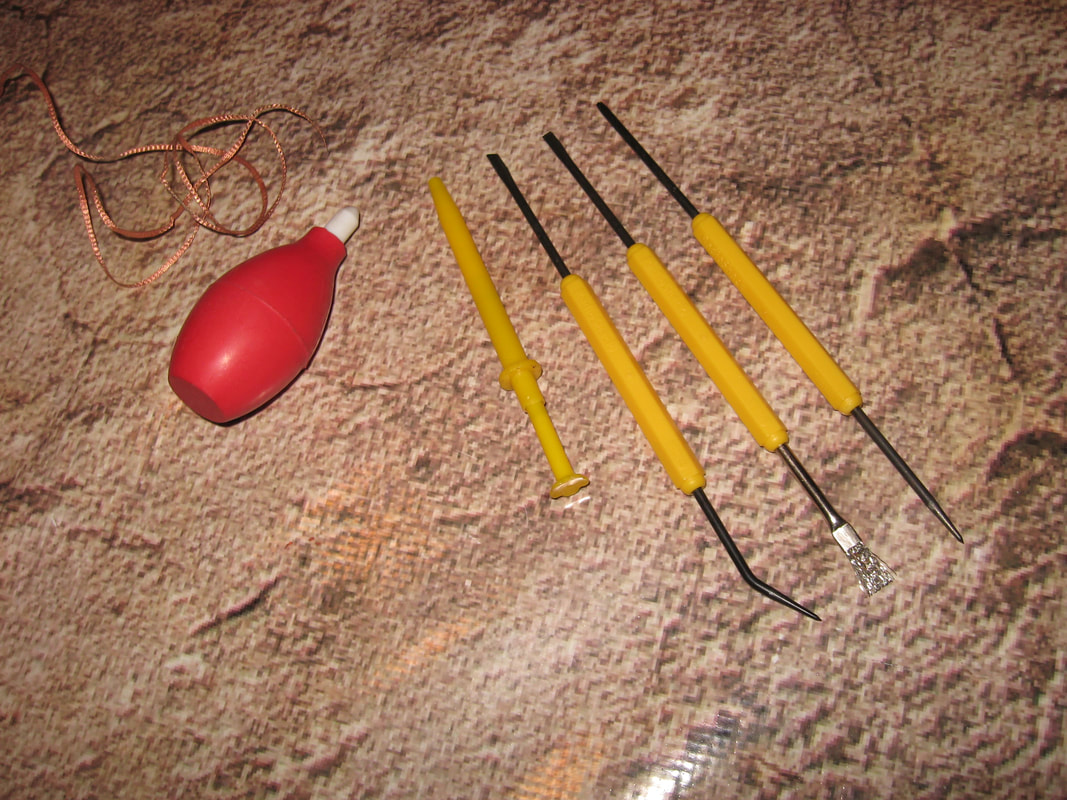
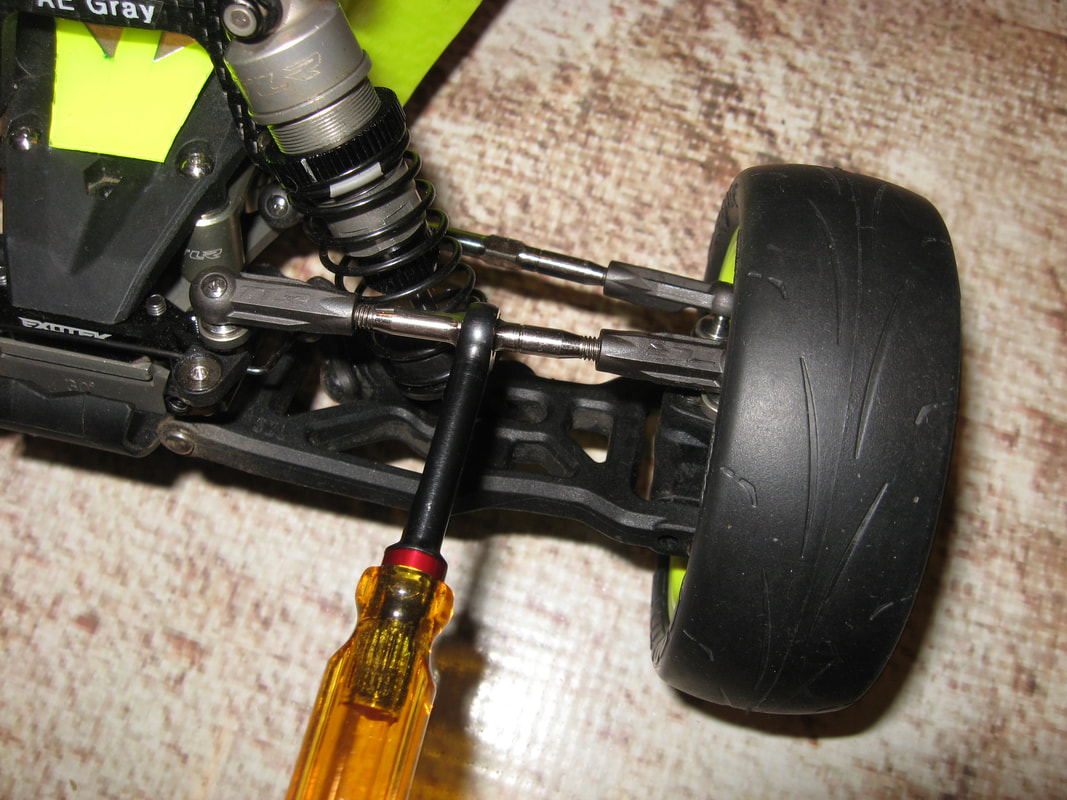 Adjusting tie rods is one of my least favorite RC tasks, however, here are some quick tips to make the task both faster and easier. Lubed & Faced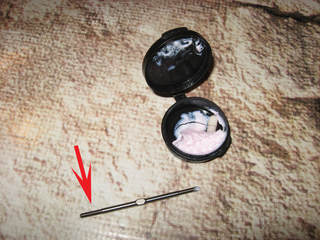 Use a quality lubricant when threading ball cups. This ensures the rods are easier to adjust later and will be less likely to "stick", or pop off. Bees wax, lip balm, any silicone or lithium base lube will suffice. Minimal lube is required, do not pack the threads. A dry lubricant (such as graphite, or bar soap), can be useful for breaking cups in, but should be cleaned out as soon as possible and can result in an increase in unwanted pop offs. Liquid lubricants, such as oils or greases, should never be used, as these will attract dirt, and result in premature wear or failure of the components. Ensure that your rods are all "faced" the same direction, meaning that all the threads face the same direction (red arrow). This will facilitate later adjustment so that forward is "tighten", and rear is "loosen". No more guessing, or looking for the small indicating groove on the rod. This is a real time saver in the pits. Tools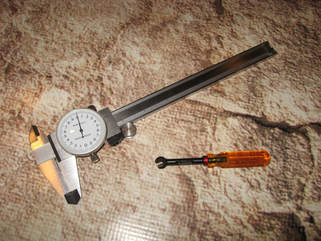 Proper tool selection is imperative. Use a high quality properly sized wrench for adjustments, never use locking or gripping tools, as these will only mare the rod. A set of calipers is a required tool for RC racing. These do not have to be expensive, have a dial, or a LCD. Inexpensive calipers can be picked up online, or at most tool supply shops. Select a caliber that is locking, meaning, that the measurement on one side can be repeated on another. I prefer a dial caliper, as it does not have batteries that may fail. The basic idea is to ensure that the left side of the car is equal to the right side, regarding rod length. Adjustments do not have to be perfect to the .00001 mm, but even fine errors can result in inconstant suspension and odd behavior of a car on the track. The fast guys know precision pays off. There are a number of quick adjustment tools for threading cups onto tie rods currently on the market. Some of these can be combined with power tools. While very fast, I prefer to do the rod adjustment by hand. If using these tools, ensure that you have the properly sized cup receptacle, and that the slowest setting is used on the power tool. It is very easy to warp (via overheating) the cup plastic, burn off the lubricant, or hyper-extend the rod shaft into the cup. TOol Hacks & wear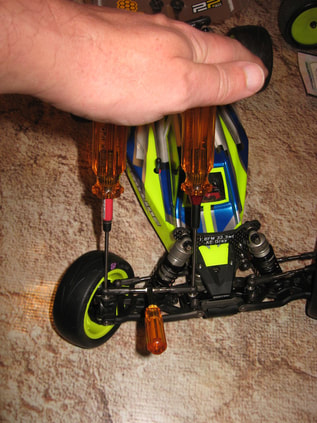 Even properly lubricated and broken in rods and cups can be troublesome at times. On more modern RC, where the ball cups have an access hole, "pinning" with two drivers for adjustment can keep ball cups in place, and your sanity intact.
Also, if you find a ball cup is repeatedly popping when running it may be time to replace it. Ball studs and cups will wear out, especially if not kept clean, and may require replacement. Ball cups should pivot easily, and should never bind. If binding, figure out why, normally due to wear, grime, or defective plastic. Clean or replace as needed. 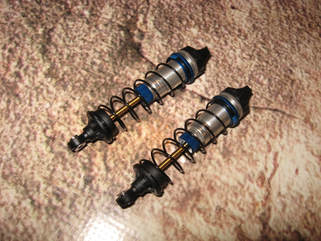 Ever wonder why the fast guy's cars seem to soak up the bumps, when yours is bouncing all over the place? A lot of this is tuning (springs and fluid), but a lot of it is simple tricks that you may not be aware of. Tuning is going to vary from track to track, but I will address some simple hacks that can put you above other racers. Parts is parts? Not all shock parts are made the same. If your kit manufacture makes upgrades for the shocks, buy them. If cost is an issue, at least get the machined pistons. Machined parts have a higher tolerance, are less likely to stick, and will increase both the speed and longevity of the parts. Depicted left is an Associated 1.6 machined nylon piston. A marker has been passed over the piston engraving, so that it is easier to read. Proper Tools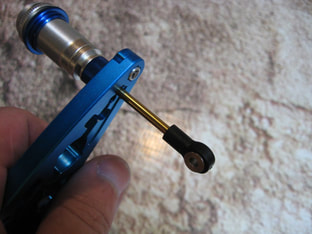 Buy proper tools to assist with your shock build. Marring of the shock shaft is the number one reason why shock seals fail, and will cost you money when rebuilding. If cost is an issue, use a scrap section of cloth or cardboard to act as a shield when assembling. Just don't clamp on it and call it good. Doing so will leave marks on the shaft, and this will tear up the seals resulting in both leaking, and inconsistency on the track. Stick it Use minimal thread lock (blue) on the piston screws, and allow it to dry overnight prior to installing fluid. Nothing worse then a piston working its way loose inside the shock during a run. Also, heavily lube the seals with Associated Green Slime (AE 1105), or equivalent. This will help lubricate the seals for initial passes until the fluid can take over. Running dry seals can cause them to unseat, and wear. Be advised that if using the lube, there may be minor leakage to the seals for a few runs, this is normal. If the leaking is excessive, or does not stop quickly, you may need to tear the shock down to asses what the issue is. Keep the shaft / seal area clean, an excessive build up of dirt will reduce the life of the seals. A simple shock brush is all that is needed (VRCMS 009). Double Check it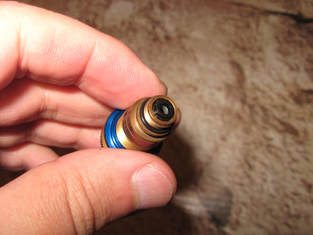 Ensure that all required parts are present (left over parts are never good), seated / orientated properly, and move smoothly. Also ensure that the shock ends are symmetrical, meaning they are threaded to the same length. Having one miss-threaded to a differing length will result in inconsistent handling and is a common mistake. Pillows This is a hack I picked up from a sponsored racer. Install an extra shock seal at the base of the shaft on all shocks. This tip is not as noticeable on very smooth tracks, but on exceptionally rough surfaces, the extra rubber spacer makes the landings feel less "jarring", resulting in a smoother more controlled run. Simple common sense tricks, result in faster times, less wrenching and more fun.
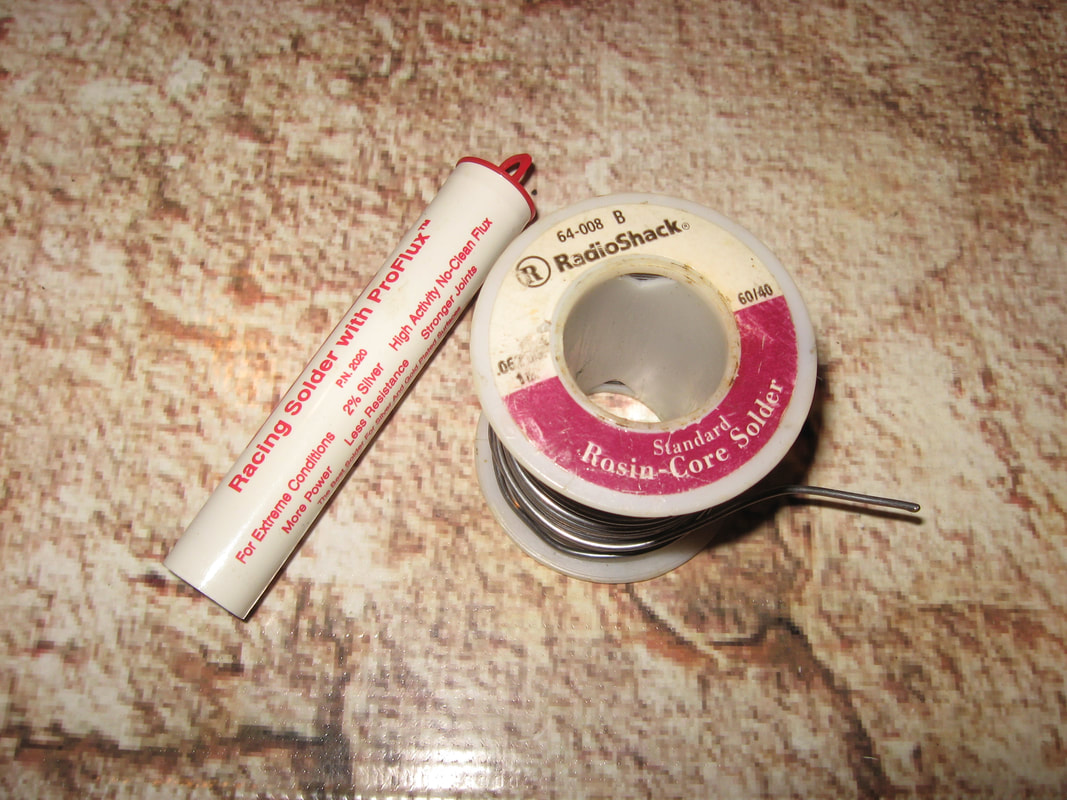
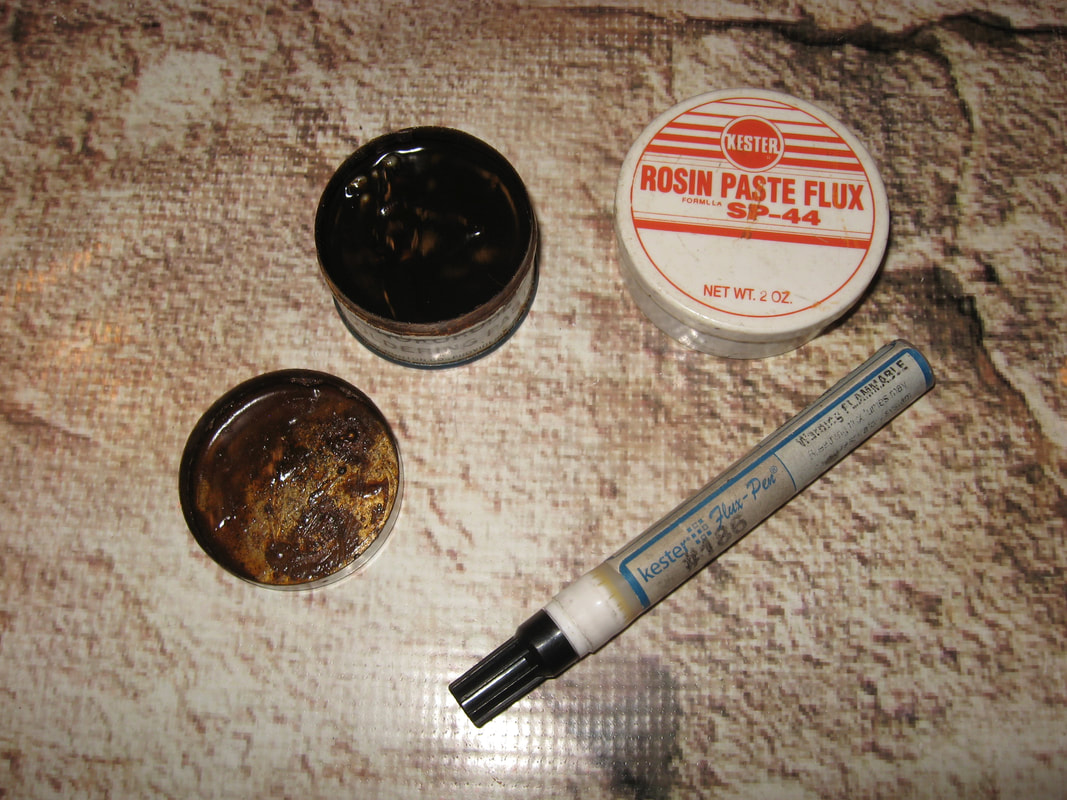
Soldering is one of the most needed skills for racing grade RC, and is often overlooked. How often have you seen a fantastically built RC race car, only to see globs of heavy solder flowing over the motor like a metal waterfall? This robs both speed and cool points. Here I will present the basics of soldering, but practicing on junk electronics is the best way to learn. Obviously, soldering involves high heat, has a fire potential, and some health concerns. Thought should be given to work site selection, and surrounding area. Soldering next to your spray can or newspaper collection is not advisable. A soldering iron should never be left unattended. If you have to leave, remember to unplug the iron. Safety goggles or glasses are a must at a minimum, and a rated respirator and flowing clean air is recommend. Avoid breathing the fumes from soldering. 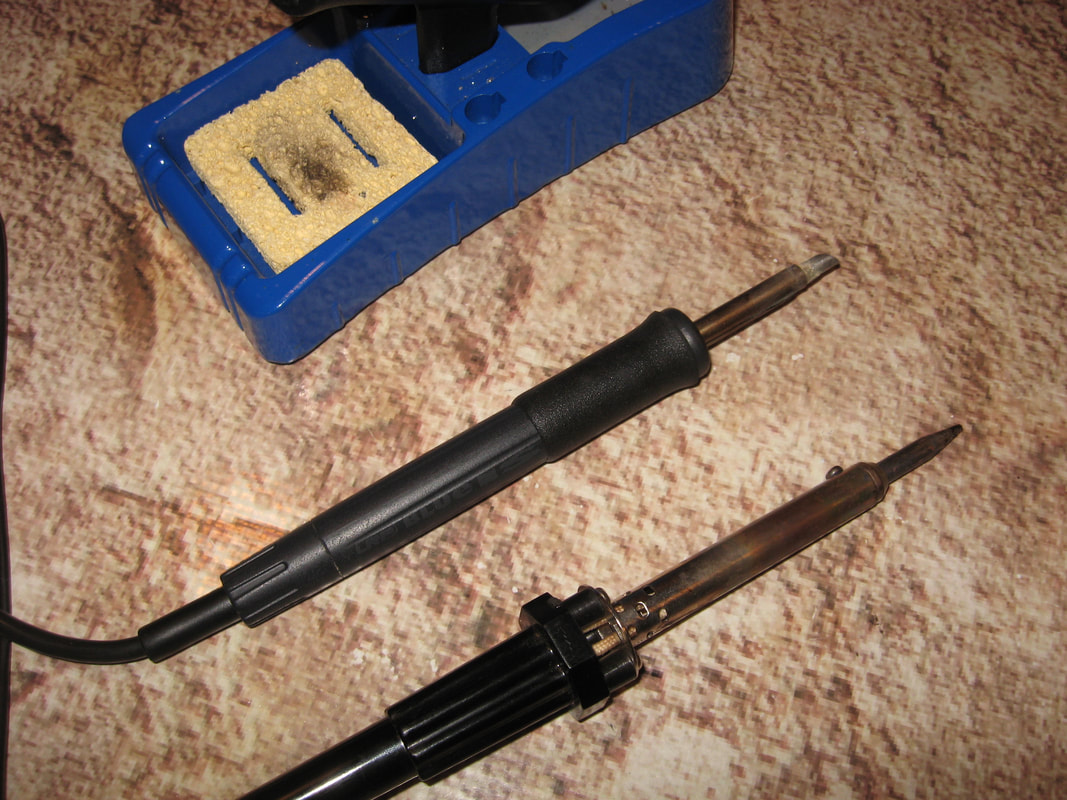 Equipment SelectionIron Selection: A minimum of a 40 Watt soldering iron is required for most RC applications including wire, battery, and motor soldering. Tip type should be chisel tip for ease of use and proper heat transfer. If your iron did not come with a chisel tip, you can make your own with a common belt sander, or rotary power tool. I keep a fine point iron around for working on the smaller wires found in radios, servos, and antennas. Keep in mind the idea is to choose the right tip for the application, overkill can easily result in damaged or melted projects. Avoid soldering guns, they are near useless for most RC applications as they do not heat-cycle easily, and often result in cold solder joints if not used correctly.
Soldering stepsSolder Site Preparation: Insure the contact points are clean and as free from old solder as possible. Scraping with a hobby knife, sandpaper, or de-soldering braid may be needed. Flux should be applied to both parts to be joined. Pre-Heating: Allow your iron to heat up prior to use. Attacking that wiring too soon and using a cool iron will result in cold, clumpy, and failure prone joint. The same is true after heating a solder joint. Allow the iron to reheat for few moments prior to soldering again. If the solder does not flow easily and quickly, stop and figure out why, normally not enough heat is the cause. Clean Tip: The water filled sponge is there for a reason, use it to keep your tip clean. Wire wool can also be used, and will not cool the tip as much as water, allowing for faster work. Use it often during your project, remembering to allow the iron to reheat for a moment after cleaning. Iron Tinning: Is another area that is often neglected. Tinning is the process of applying a small amount of solder to the tip of the iron so it is covered in a thin layer of solder. Tinning helps to protect the tip from oxidation, overheating / melting, and also facilities the transfer of heat between your project and the iron tip. Iron tips will wear out, but if yours has "craters" in it, odds are the tip was not properly tinned prior to use. Application Tinning: After flux application to the parts being soldered, apply a small amount of solder to both parts, but do not join them yet. Use only the least amount of solder required. Parts should be thinly coated with shinny new solder. Joining: Once all parts, including the iron tip are tinned, join the parts by applying the iron. Use a small amount of solder to facilitate heat flow and join the parts. All parts should join in a moment with a minimum of both heat and solder used. If the parts are not joining, you are having to apply a lot of force, or heat for an extended amount of time, something is wrong. Find out what the issue is, normally not enough heat or flux being used. Joints should be smooth and shinny. If it looks like a clumpy lava mess, it was not done correctly. Iron Storage: Iron should be heavily coated in solder and allowed to cool to room temperature prior to storage. This will help protect the tip from oxidation, and will need to be cleaned off prior to use. 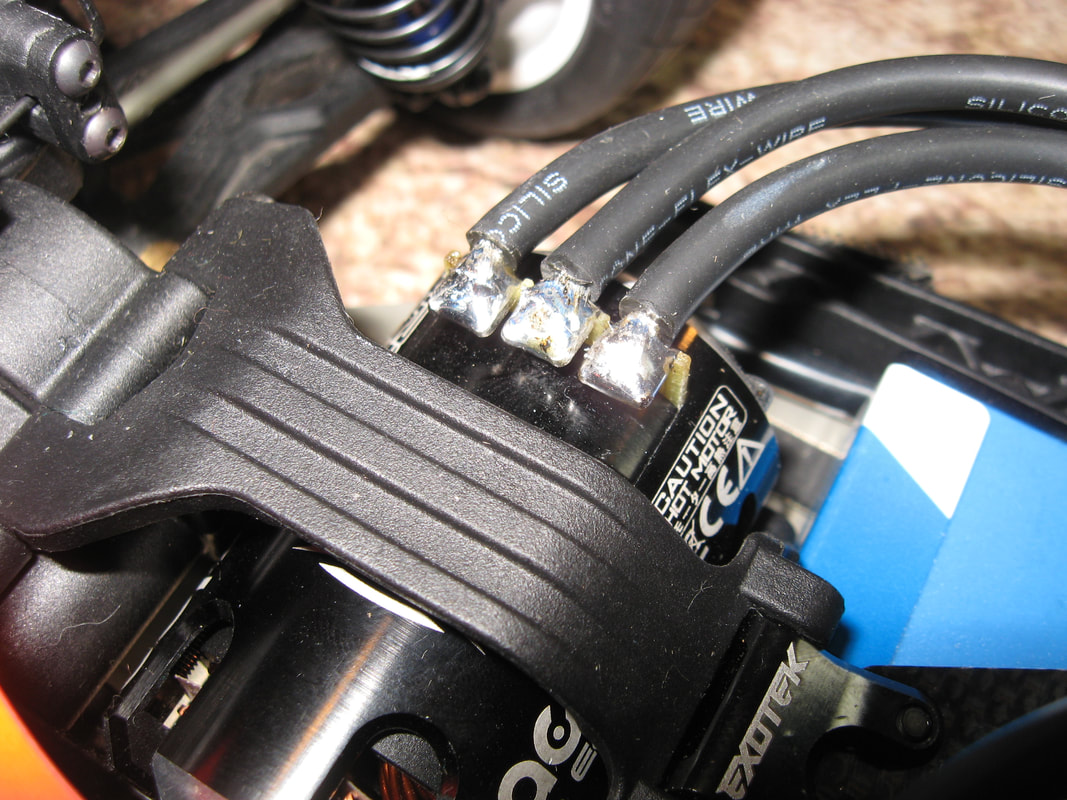 Using the tools you have, as they were intended, will allow you to put more time on the track instead of trouble shooting. My number one rule for RC is, "Learn how and why things work." Once you understand the task and objective, the fun is the easy part. Soldering is no different. First, do not attempt this modification without eye protection. Further, be prepared to ruin a few bearings, and No. 11 hobby blades as you get the hang of it. 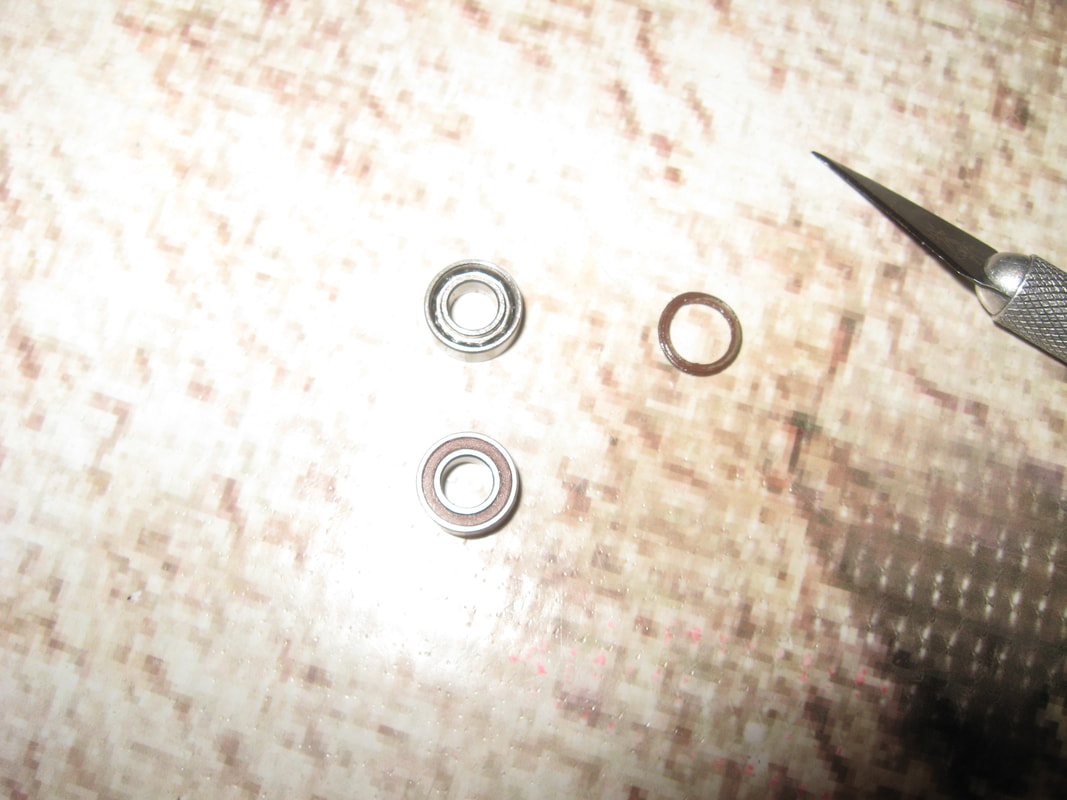  This tip will work with any shielded type ball bearing, but works better on rubber sealed types. Simply pry out one side of the shield. Be aware that the metal tip of the knife blade can break and fly off, and of course, slipping is always a cutting hazard. Reinstall the bearing with the shielded side outward, facing any exposed dirt. Idler gear and internal top shaft bearings can have both shields removed since the transmission is normally sealed.
This reduces friction by eliminating one side of the bearing race contacting the shield. Increased maintenance may be required, however, if you keep things clean I have never known it to be an issue. This does make a noticeable increase in speed, lowering lap times, and has been a sponsored speed secret for a number of years quietly kept under wraps. Just don't tell anyone... 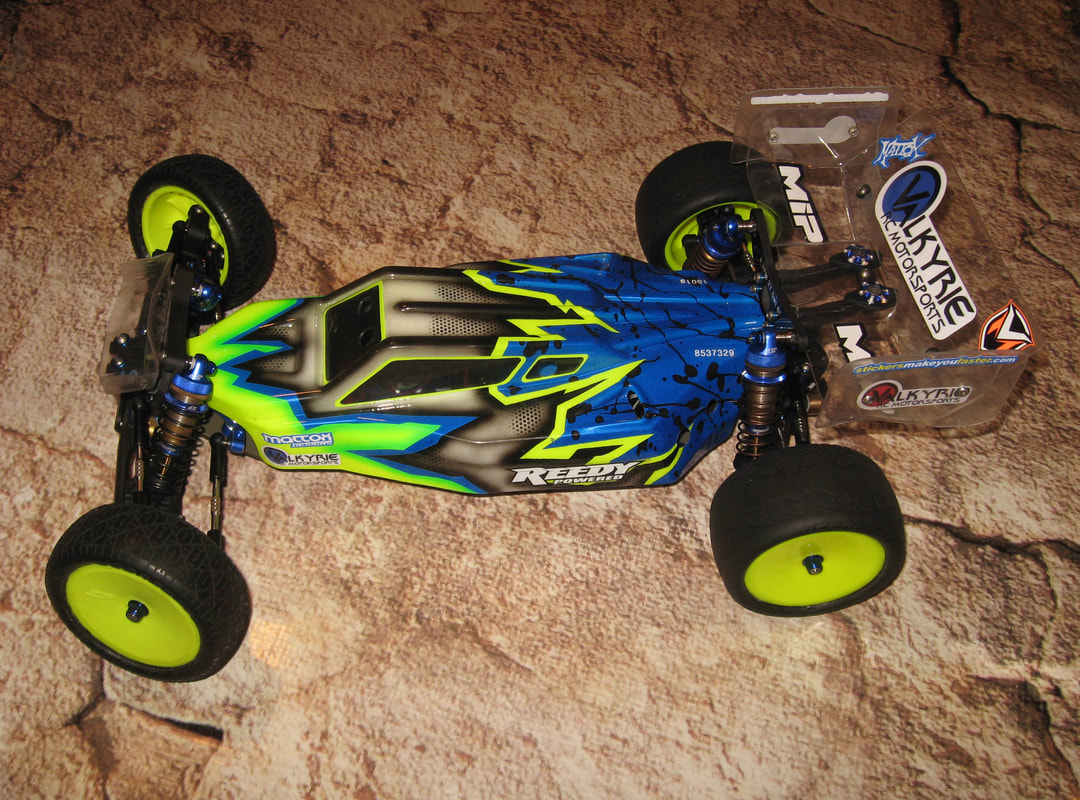 The Associated B6.1 kit is impressive enough, but after years of racing, I wanted something pro level to compete with. Race ready car weights in at 1503 grams, near the ROAR limit. 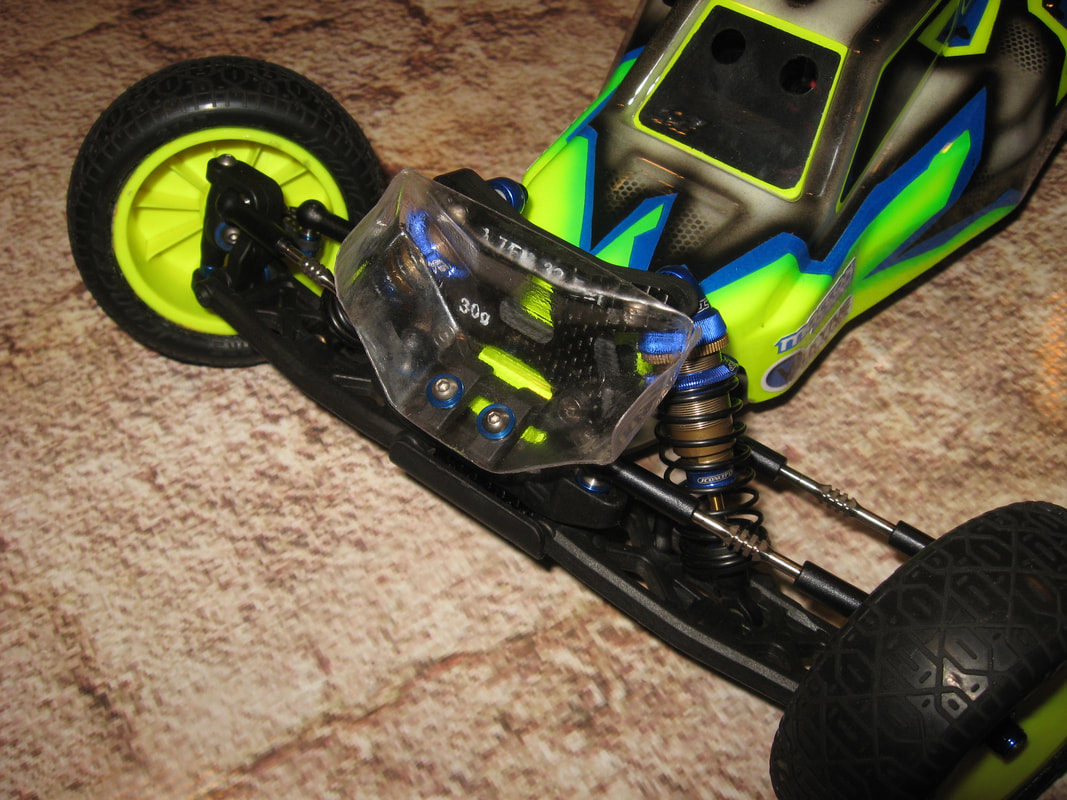 Associated B6.1 front end photo with JConcepts front wing, titanium rods, and shock jewelry. 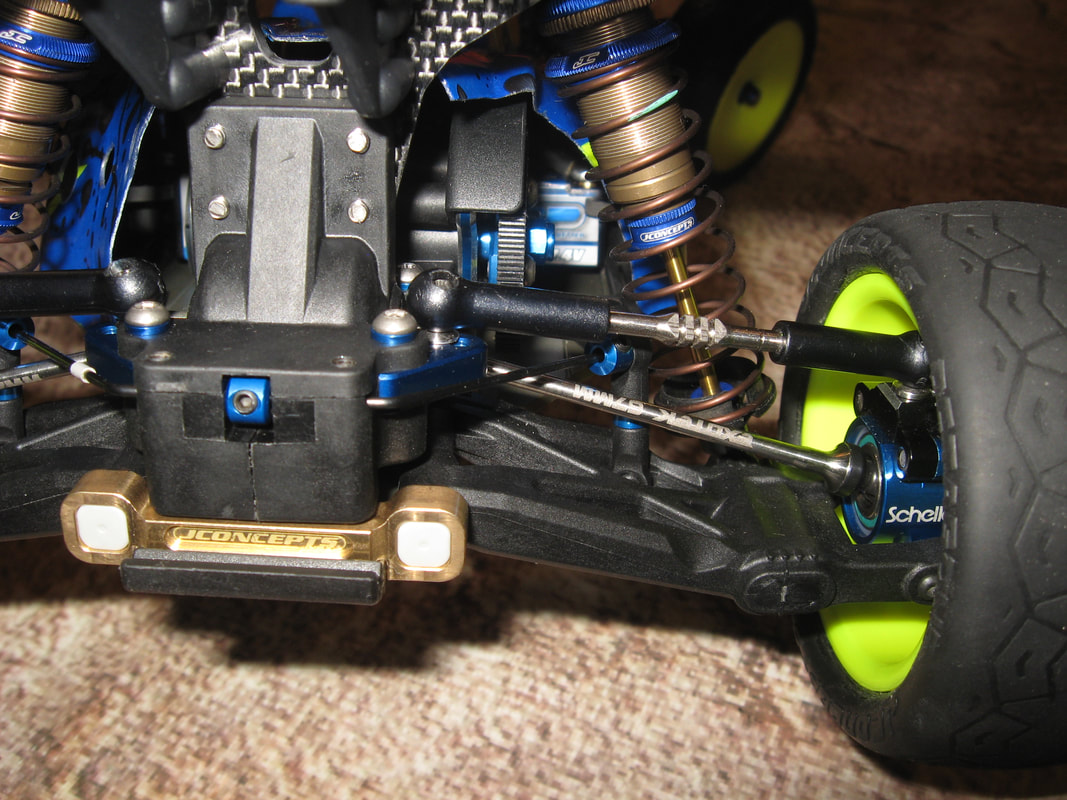 Associated B6.1 rear end photo with JConcepts titanium rods, shock jewelry, and Exotek MIP modified pucks installed. 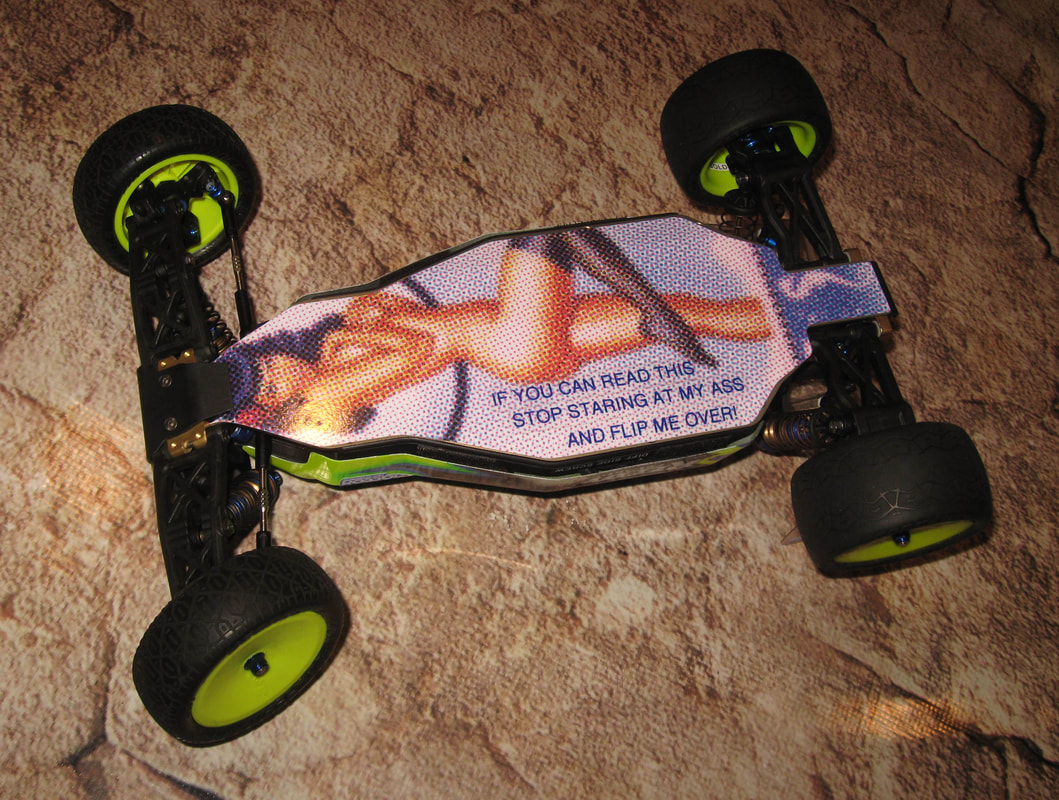 Associated B6.1 with modified Mattox humorous chassis skin (Wording is custom and not included with the Mattox skin). I figure either the turn marshal will have an incentive for getting my car, or at least an excuse for any delay. 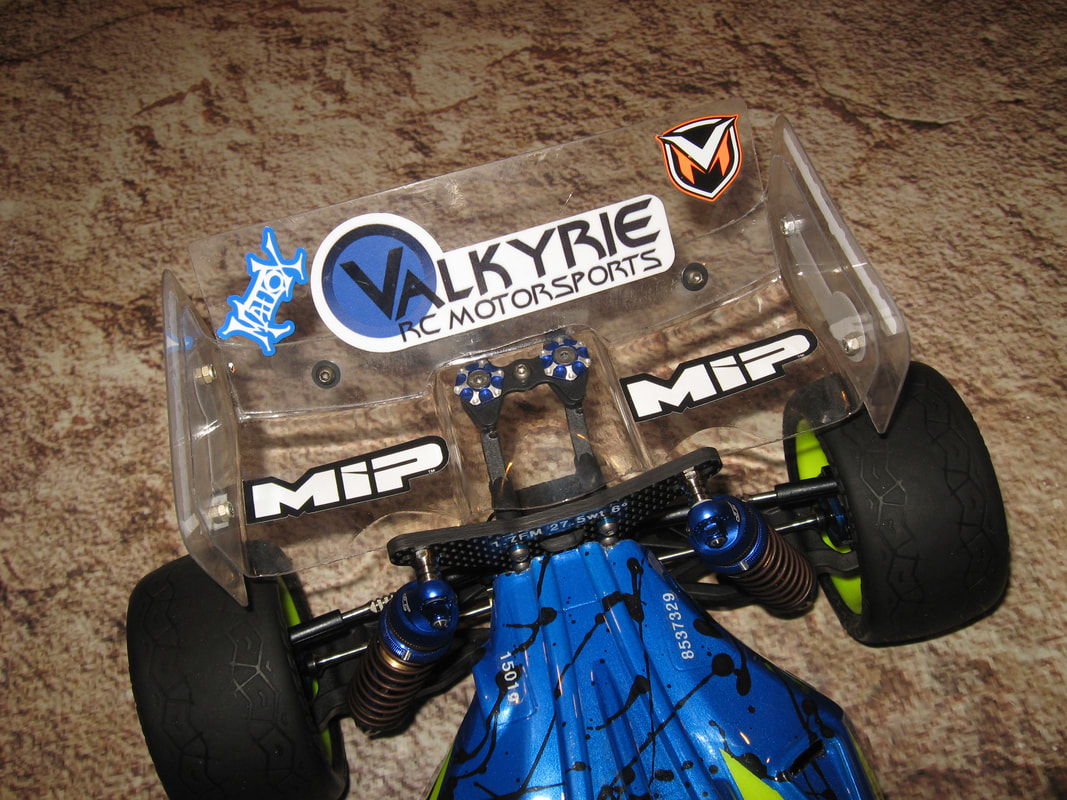 Associated B6.1 with over-sized rear wing installed. There is a section on this blog as to why I run this modification. 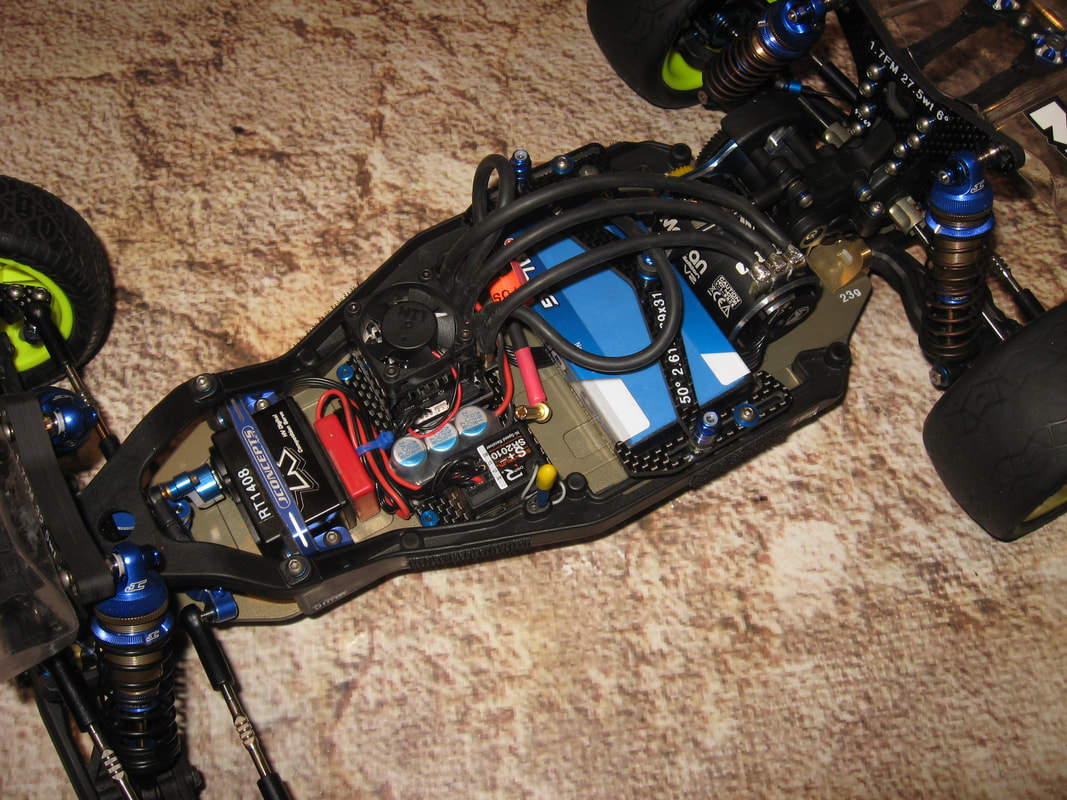 Associated B6.1 with pro level electronics installed. The Maclan ESC is well worth every penny. Custom set up decals are also displayed. 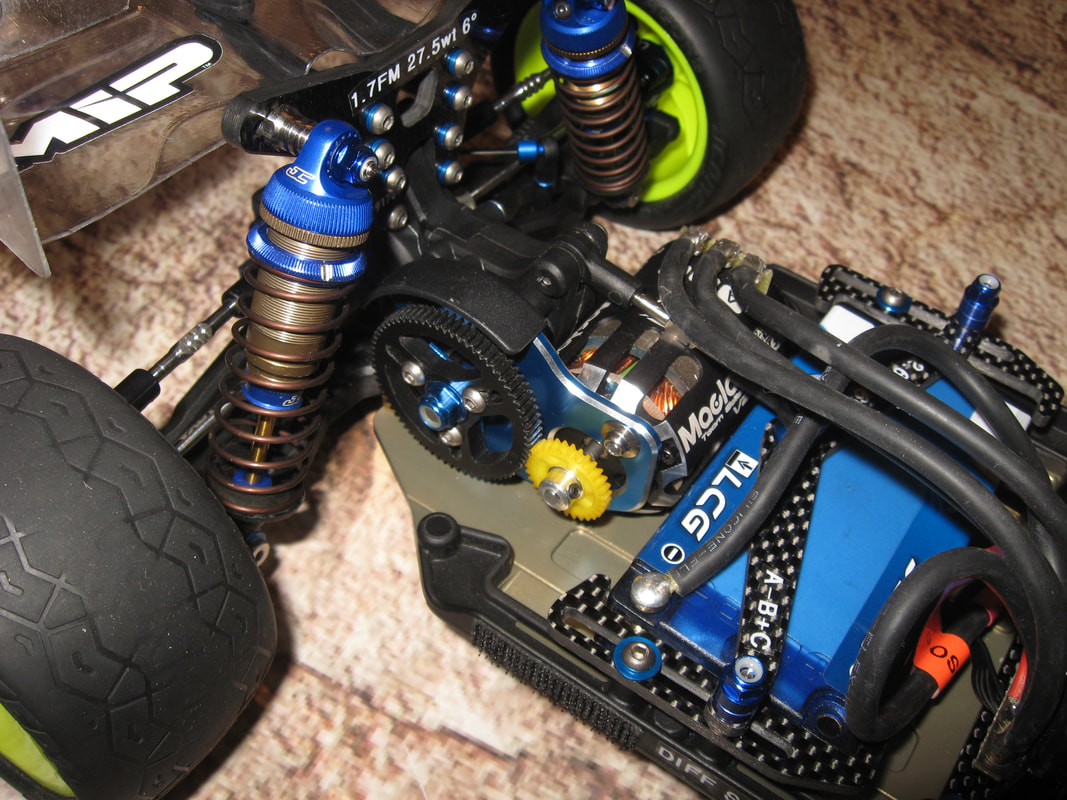 Associated B6.1 with Exotek direct drive installed. Top shaft is Associated, but I went with the Exotek spur and adapter for one reason. Blue is simply faster. PARTS LISTING: 175RC
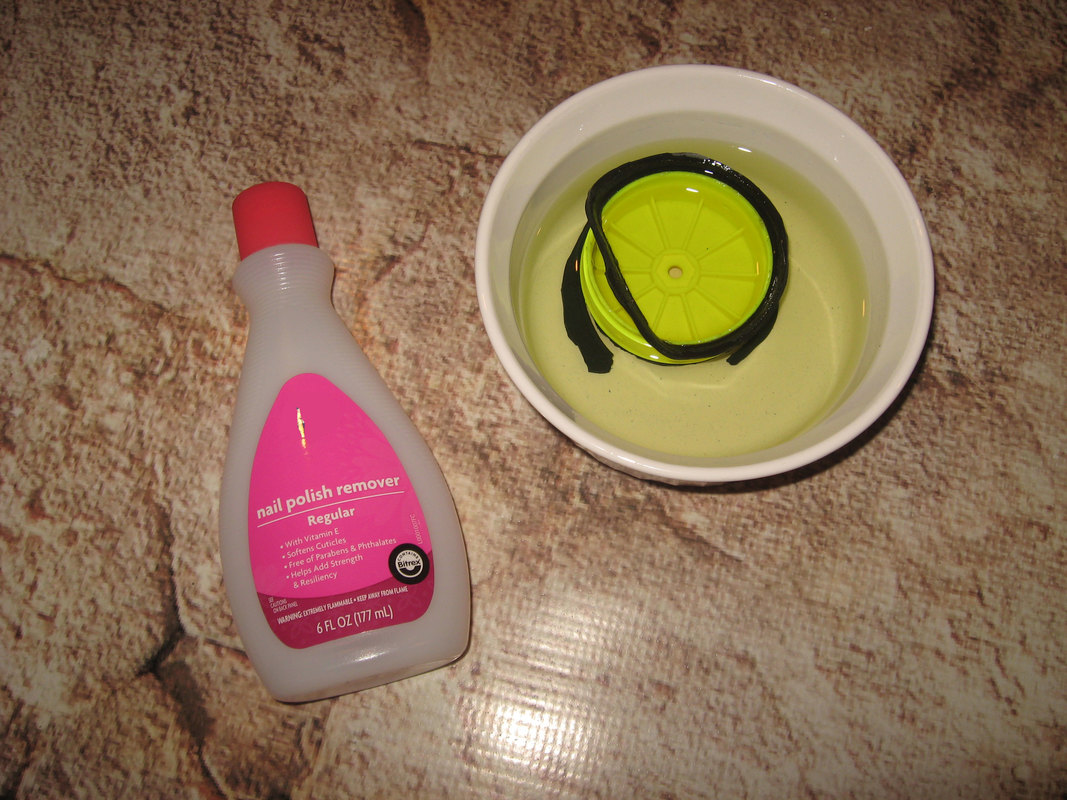 RC racing can get expensive. Tires and wheels are a big part of a racer's expenses. I have found a few tips that will save you money by being able to reuse normally discarded wheels or tires.
Foam: This process can also be used to salvage tires that are mis-glued, or tires mounted on a differing brand or vehicle wheel then you normally use. If doing so, ensure that the container has enough room to contain the internal foam as it may swell many times its normal size. Foams treated in this manner are normally degraded by the Acetone and should be replaced. Note: Acetone is highly flammable, and should be kept away from open flame, and placed in a rated sealed container when not in use. Rated gloves and eye protection are recommended. Container used for this tip should be clearly marked as not for human or animal consumption. Acetone is poisonous. Container should be covered and kept away from children and pets for this reason. Excess Acetone and any resulting residue should be discarded properly. Last, not all RC plastics are the same. I have run into a few wheels where the plastic was damaged by this process, mainly some vintage rims. If wheels are painted, the finish may be dissolved along with the glue. If concerned, spot check first prior to soaking. |
AuthorMichael Rogers Archives
July 2022
Categories |


 RSS Feed
|
|

|

|
The best way to search for the part you need is by the manufacturer's part number. If you do not know the part number, please visit our Archive Page, or use a common term like, "Losi XX shock tower."
All prices are in USD. Copyright © 2011-2024 Valkyrie RC Motorsports LLC. All rights reserved. All product names, logos, and brands are property of their respective owners. BBB current rating is A+.